Key Takeaways
1 min summary- Knowing Apple's $99 yearly fee and your build cost (from $15,000 with Octal Digital) is vital in judging how much money your app should aim to earn.
- Don't plan on Windows alone, as each iPhone app will need a Mac with Xcode for building, signing and uploading.
- If you're considering an AI or no-code builder, keep in mind that many builders have feature limits, which will cap how much your app can do.
- With Swift and SwiftUI in Xcode on a Mac you already own, you could build a fully native app for only Apple's yearly developer fee.
- Choosing between coding, a builder and an iOS team depends on your skills, your budget and who should own the code too.
Want to make an iPhone app or create an app for iPhone users but not sure where to begin? Look at the Apple developer rules before you sign up!
It’s easy to make an iPhone app: plan one job, pick a path, build in Xcode, test, then submit, but first, you must meet the Apple developer requirements. You’ll want to have a Mac computer, a free copy of Xcode, and enough Swift knowledge to keep your users happy.
Building an iPhone app is like building any other product. Even though you are a small business and not a big studio, your brand’s reputation and the trust of its users are on the line.
What Do You Need to Make an iPhone App?
Even though you aren’t a big studio when you build for iPhone, Apple has strict rules iPhone apps must meet.
Fortunately, the rules aren’t too hard to follow, and almost two million apps sat on the App Store in 2024, so that’s encouraging. But knowing the rules and why Apple sets them matters. This is for a couple of reasons.
First, they aim to protect everyone’s privacy. They do this by asking anyone who publishes with them to have a verified account and a working, stable app. This gives users a sense of safety when they install an app on their iPhone.
As far as app quality, Apple takes App Review seriously. They check your app’s content, its features, and your privacy details. For example, if your app is too thin or has a habit of crashing, they may not approve it for the App Store. They only want to list apps that will take their users seriously and can protect user data.
What You Need Before You Start
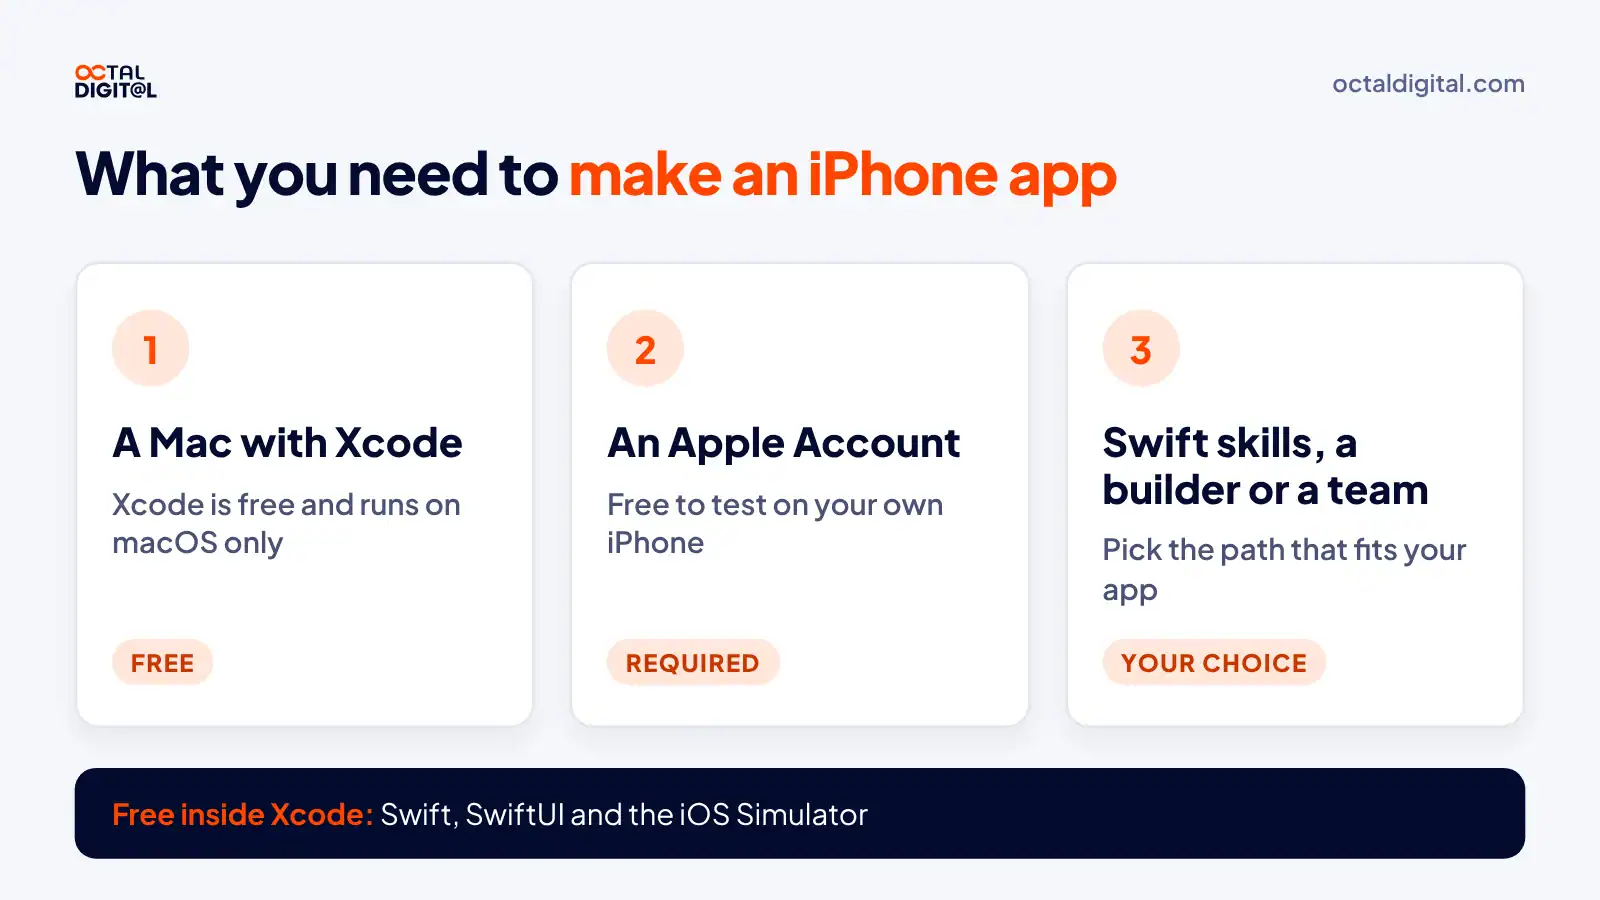
The basic iPhone app requirements may look long but are very simple for a first project. Here is what you have to do to meet Apple’s basic requirements.
1. A Mac and Xcode
Apple cares about the developer’s skills, and it cares about the computer too. The mix of a capable developer and a recent Mac sets your app up for the best result. Like apps, Macs have to meet a version check. Developers must build their apps in Xcode on either a Mac laptop or a Mac desktop. This is to make sure the app is built with the current Apple tools.
Also, like apps, Apple cares about the version of the software. Apple wants apps built with a recent Xcode release (Xcode 26 or later for uploads since April 28, 2026) to make sure they have the newest SDK features and are less prone to break down.
Your Xcode download will tell you if your Mac is supported, but you can also look up the macOS version and model of your Mac on this page to see if it’s supported.
2. An Apple Account
Wondering how much you have to pay to become an iPhone developer? You aren’t alone! Apple has specific plans for developers.
For example, even though an Apple Account is free to create in most places, Apple won’t let you publish an app until you’re in the paid program, but you have to meet the enrollment requirements first.
Testing on Your Own iPhone
Even though you just need a free Apple Account to test an app, that isn’t enough to become an App Store developer. App Store developers must be in the Apple Developer Program, which costs $99 a year. So if you’re on a free account but don’t have the paid membership yet, you won’t publish until you have the paid plan under your belt or your company enrolls.
3. Skills or a Builder
To build an iPhone app, you must bring specific skills or tools for the job. You’ll pick the tools for your project when you open Xcode for the first time. All iPhone app makers should have the following:
- Swift, Apple’s programming language
- SwiftUI for the app’s screens
- An iPhone on a recent iOS, so you can test on a real device and not just in Simulator
- Or a no-code builder in place of code
3 Ways to Make an iPhone App
Should you code it or hire out your first iPhone app? While a builder isn’t permanent, according to Apple’s App Store reports, more submissions went to App Review each year from 2022 to 2024. The decision mostly comes down to three main factors.
Those factors are:
- How much your app needs to do
- Long term cost
- Your skills
You’ll want to work out how much your app needs to do and what will cost you less overall and give the best value. There are upsides and downsides to coding, using a builder and hiring. While some founders swear by one path over the others, it’s key to fully understand what each path means for an app and why it may or might not be the right call for your needs today.
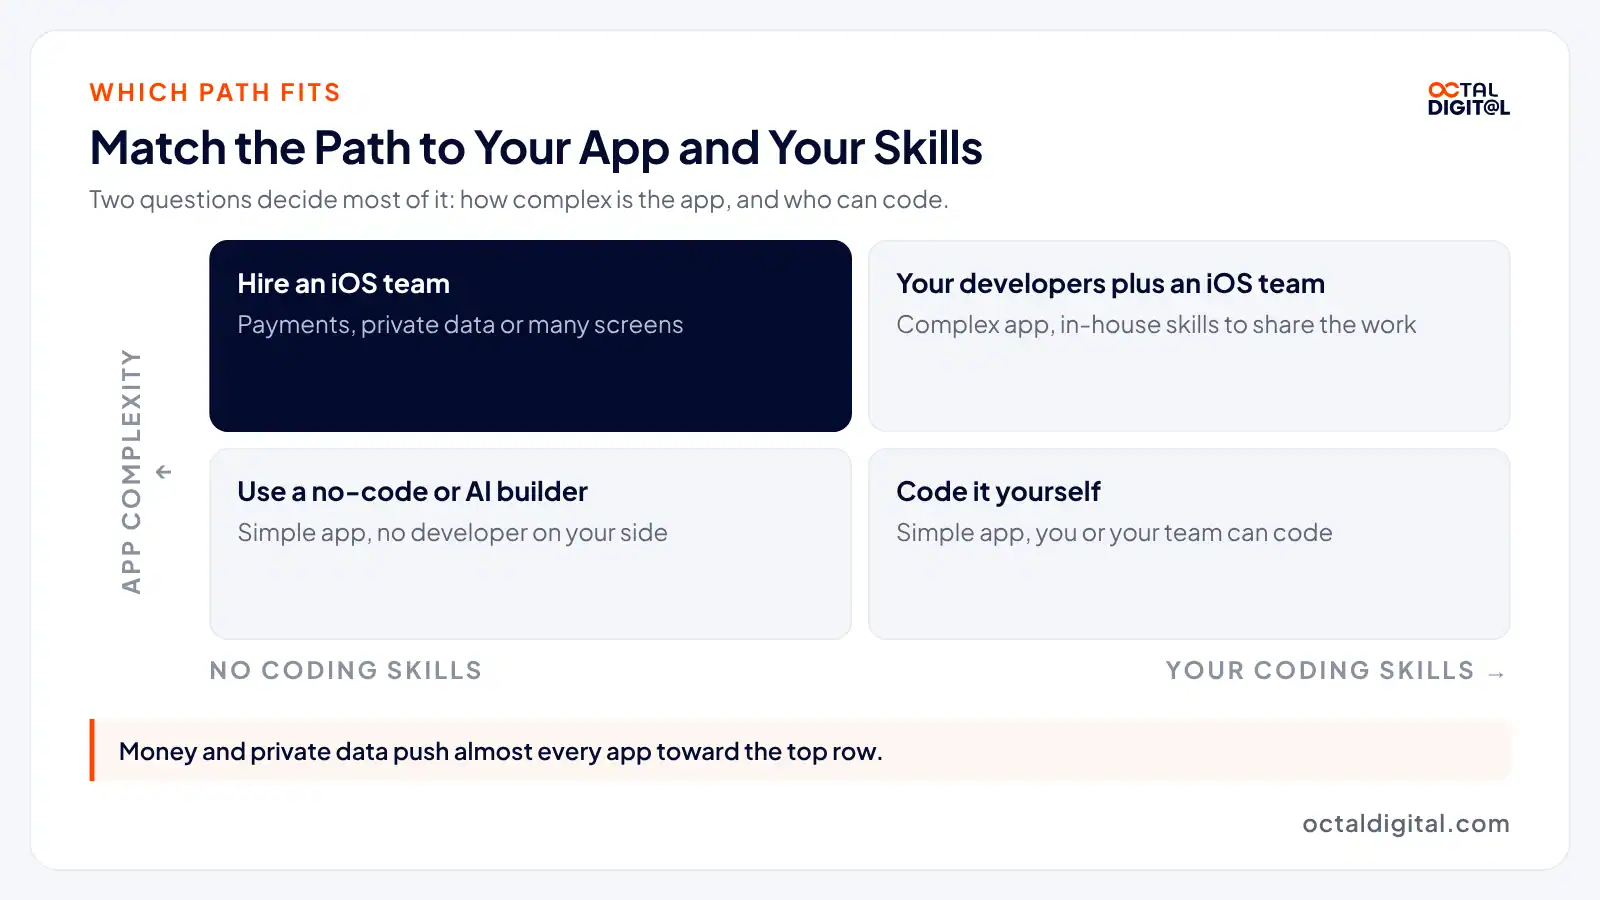
| Path | What you need | Best for |
|---|---|---|
| Code it yourself | A Mac, Xcode, Swift skills and $99 a year to publish | Founders who code or want to learn |
| No-code or AI builder | A builder plan and clear screens | Simple apps, tests and prototypes |
| Hire an iOS team | A budget and a clear first version | Apps with payments, private data or many screens |
1. Code It Yourself in Swift
Coding the app yourself often allows you to ship a sharper app for a lower upfront cost. The Apple Developer Program for a solo developer is $99 a year.
If you want to build an app with extra features and put down a smaller cash outlay, coding it yourself may save you real money upfront compared with paying a team many thousands of dollars across the life of the project.
We went to Apple’s developer site and checked the numbers to see what a first year of coding costs for a Mac owner with Xcode installed.
As you can tell, the typical solo developer would pay $99 per year and nothing more for Apple’s tools across the life of the app. Let’s say you hired an agency for the same app and paid a deposit up front.
You’d spend far less, depending on how fast you pick up Swift.
If you’re going to code the app, it’s smart to choose a project that has a smaller first version. Most apps will need updates soon after you push them to the store. However, the big factors that shape a solo build are time, skills, and testing.
Another reason why coding may be better than hiring a team is if you’d rather not deal with lots of costly change requests and contracts. Most things are covered in Apple’s free docs and sample code, and this isn’t the case every time you hire a team. Also, when a version is done, you get to ship it yourself and not worry about handing it over or having to wait on anyone.
2. Use a No-Code or AI App Builder
The key benefit of a builder is that you can have a working app once you finish the drag-and-drop setup. Yes, the monthly fee may run a bit higher, but when you have a simple idea, you can score a quick launch or even a free plan to test it. Right now, builder plans range widely in price depending on features and app limits.
When you use a builder vs. coding it, you’ll also face more limits, mostly when it comes to the amount of custom logic you can add.
Many builders have feature caps that you need to stick to each month or risk paying for a higher plan. If you’re a growing business, this likely won’t be practical since you might not want to cap how many users you can serve and how big you can grow.
It’s not uncommon for builder apps to run into App Review trouble under guideline 4.2 on minimum functionality. There are some builders that export real code, but you will pay more for each plan you move up. Who wants to fund an app they’re building plus a rebuild?
Of course, you’ll be fully responsible for all design and content choices when you use a builder. However, you can often reuse some of these screens later if you move to a full build.
Using a builder may allow you to test more ideas too and be able to cut those risks over time as your app grows.
3. Hire an iOS Team
With a development team, you’re paying experts to produce a native or cross-platform app with the goal of launching sooner and owning the code, if your contract says so.
With a freelancer, you’re basically renting one person for a fixed stretch of time, often at hourly rates. When your contract ends, you can either keep the freelancer by signing a new deal or hiring a full team, or you can start fresh with another developer.
Team projects can take longer than builder projects, which are usually quick to set up. In many ways, hiring a team or using a builder can be compared to hiring an architect or buying a kit home. With a team, you’ll receive more help when it comes to handling design and testing, but you’ll pay more in what you spend and who you depend on.
A custom build will give you far more control and freedom. A builder is still an option as long as you understand its limits.
- A written scope and cost range
- Fixed price or hourly, your choice
- 5.0 rating from 250+ client reviews
How to Make an iPhone App in 7 Steps
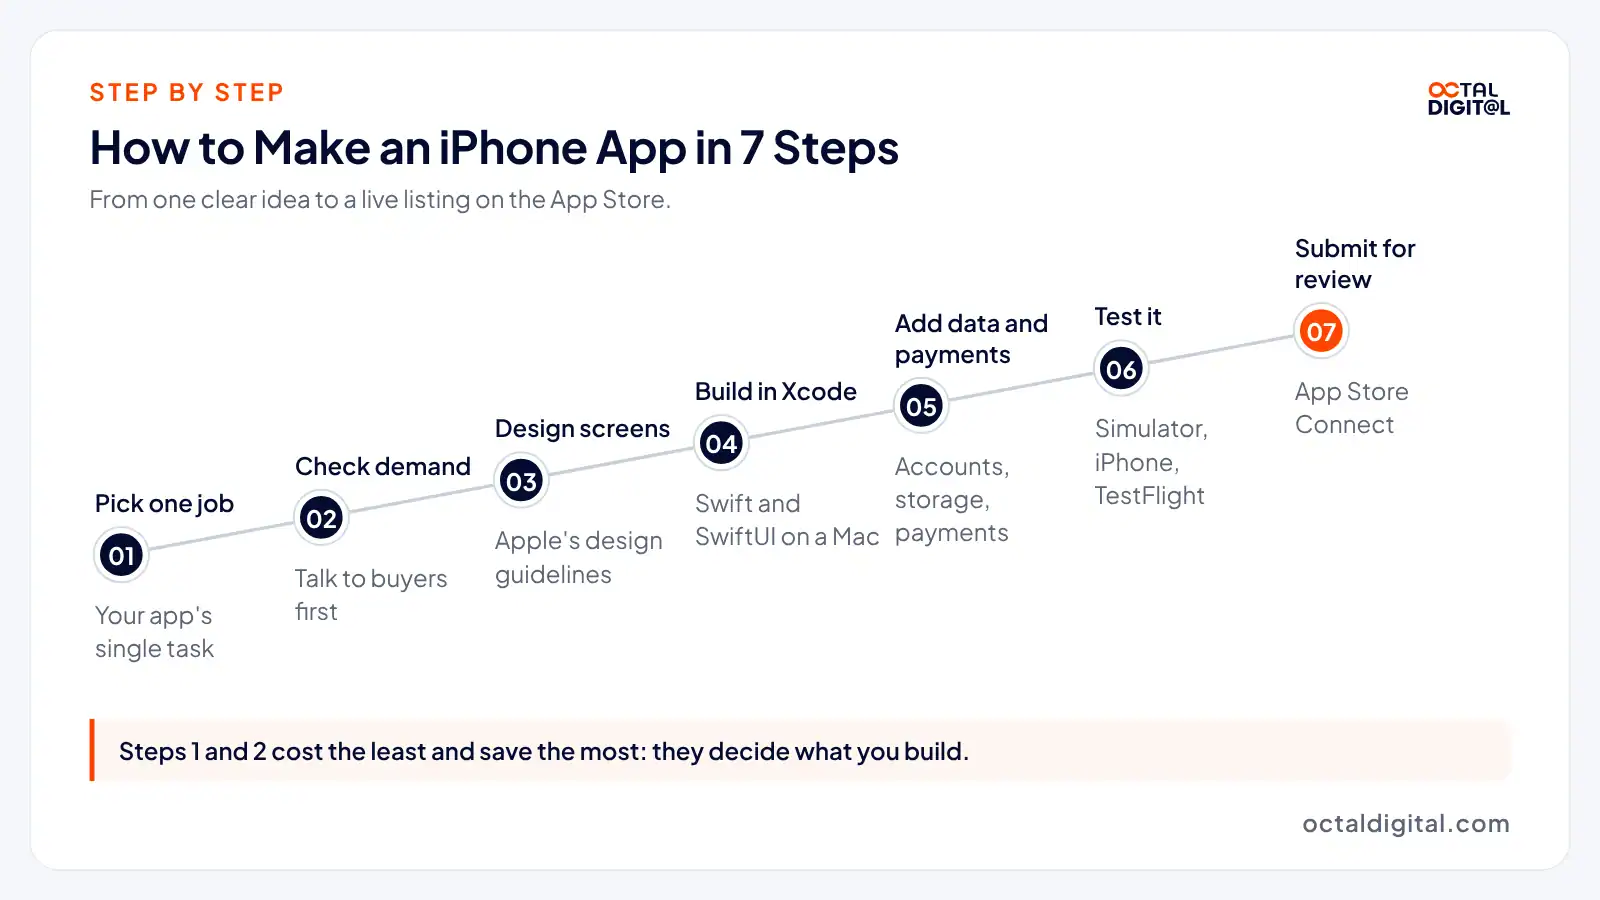
Before you build an iPhone app, follow these app development process steps that play a big part in how much your app earns and how users take to it.
Step 1: Pick the One Job Your App Does
If your app only does a few vague things, you aren’t going to get much use out of the App Store. But, the earning upside is strong if you build for a clear problem with many users and people paying for a fix.
See if you can shape your idea around a high demand for one specific task (your MVP) to make the app worth building. If not, you might spend more time and money than the idea warrants.
Step 2: Check That People Want It
You get to keep all of the feedback early users give you, but you may not get much feedback if you aren’t asking for it.
Interviews during the planning process, a simple landing page, and going the extra mile to make sure your users’ needs are covered is the secret to a stronger launch. If you aren’t a talker or you’ve had a long shift at your day job and lack the energy to run interviews, consider a short survey of your target audience instead.
Step 3: Design Screens to Apple’s Guidelines
While a single screen might support your idea, it usually takes several screens to be a full app. Still, it can work if you start with one clean user interface flow for a high-demand task and with designs that follow Apple’s Human Interface Guidelines.
But don’t go overboard trying to design as many screens as possible. Instead, work out how many screens you need per task based on your total features for a version and the steps users take. If it’s not a short enough path, treat the extra screens as later work and look for something else to cut that won’t need as many taps for little value.
Step 4: Build It in Xcode With Swift and SwiftUI
It may not sound like much work to build a screen, but it’s technically and mentally draining. First, coding is detailed. Then you need to deal with bugs, which aren’t always obvious.
Before doing this work, think about how much time you need to put in per week to hit your goals, and judge if the effort you have to put in to reach that target is worth your time and focus.
It may not be as tiring if it’s a fun weekend project for a small app. But when you’re doing it as your main job, you need to be careful about where you start and the features you build first.
Step 5: Add Accounts, Data and Payments
When you build the back end, your app will need some services to handle identity, storage, and payments, including the following:
- Sign-in: Sign in with Apple or an email login usually suffices
- Secure data storage: Your database must be locked down and not have any open access
- In-app purchases and receipts: Apple’s in-app purchase is the default for digital goods (US apps may also link to outside checkouts), so keep proper records of each sale
- A privacy policy: Your policy helps users know what data you collect, so make it plain but complete
Step 6: Test in Simulator, on an iPhone and in TestFlight
After building the core features and gathering your test devices, it’s time to test your iPhone app.
- Open the iOS Simulator: Head to Xcode’s run menu and pick an iPhone model. You’ll run your app on screen, and Xcode will show you any crash to fix.
- Run It on Your Device: Next, connect the iPhone you’ll test on, either by cable or over Wi-Fi.
- Agree to the TestFlight Beta Review: Next, if you’ll use external testers, send your first build to a beta review. Read the notes, and add your beta app description and review information. You’ll also invite your testers at this point, as that’s how they install the beta.
- Upload Required Builds: Before TestFlight, you’ll send up the required build, including your app icon, version number, and build number.
- Say Cheese, Add Your Screenshots: Finally, you’ll add your App Store listing screenshots. If they don’t match Apple’s size rules, App Store Connect may refuse them, and you’ll have to make another set. If you haven’t made screenshots yet, you can take them in the Simulator and save them from there. Again, be sure you follow the size rules and show real screens so it’s easy to see your app.
Step 7: Submit It in App Store Connect for App Review
After uploading your build, it’s time to wait. Apple tries to get submissions through as fast as it can, but it depends on several factors, such as the number of submissions and the review notes.
If everything checks out, you can release your app on the App Store whenever you’re ready.
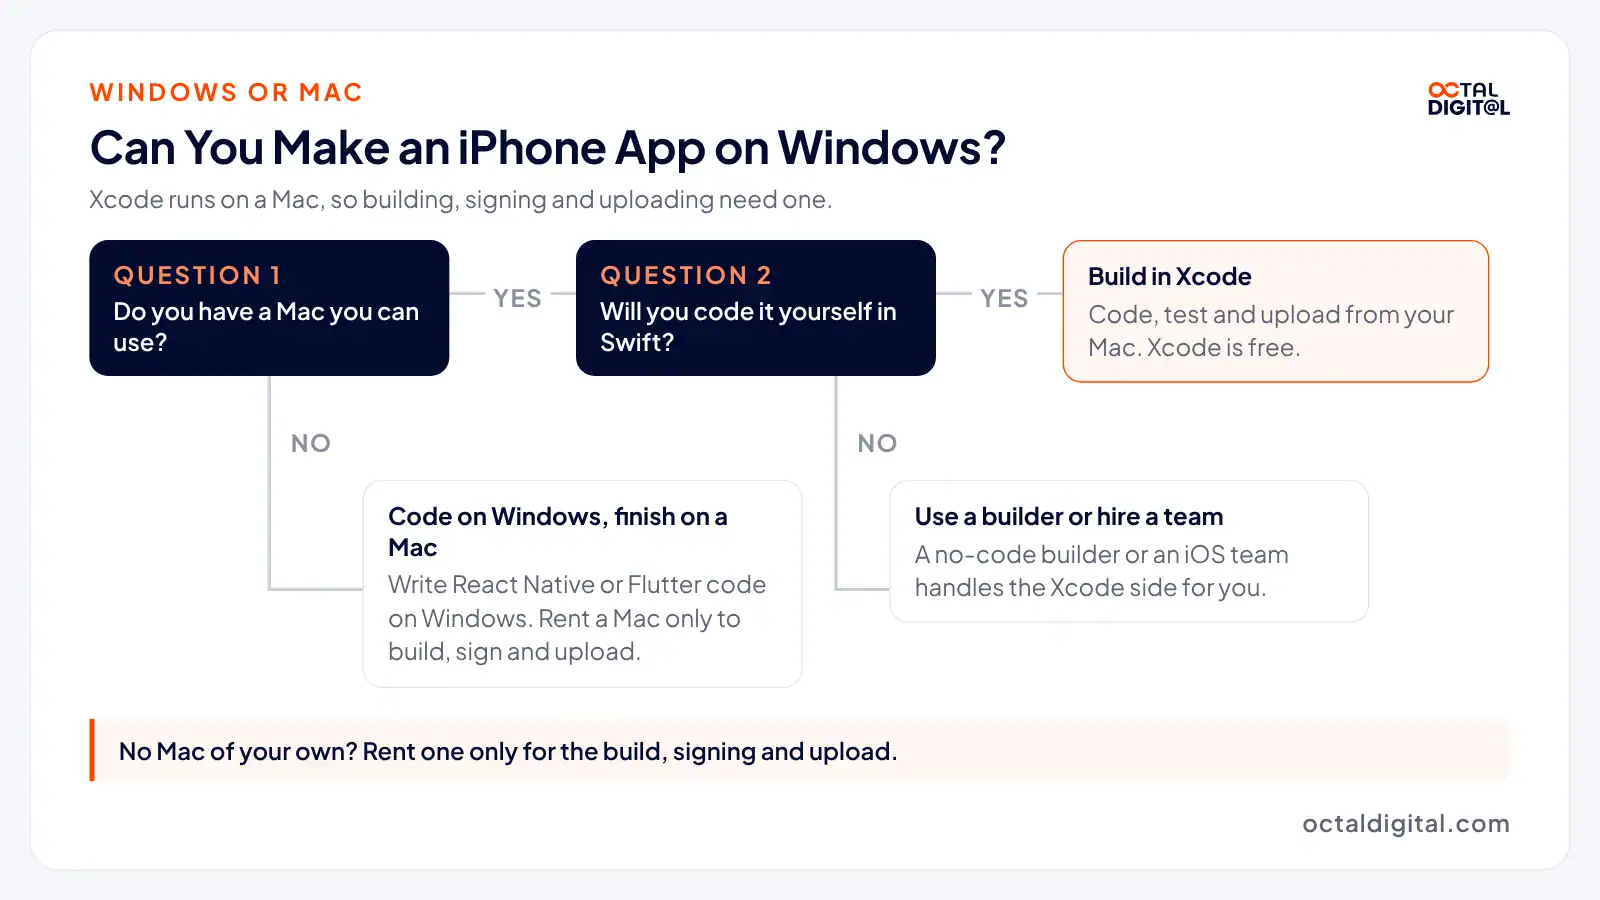
Can You Make an iPhone App on Windows?
If you already code on Windows, the good thing is you’re partly set to build for iPhone. You don’t have to start over.
To finish the iPhone version, use a rented Mac at the final stage of your process and open Xcode. In this program, sign and upload the app.
You’ll now write code for Android, plus iPhone. You can also keep your usual tools on Windows in this setup. Say, if you aren’t ready to buy a Mac, you can write React Native or Flutter code on Windows and only rent a Mac for builds.
The nice thing is one codebase covers both iPhone and Android in React Native or Flutter, so you won’t have to manage two separate apps.
Can ChatGPT or an AI Builder Make an iPhone App for You?
Before learning how to use an AI app builder, let’s look at the reasons to consider using one.
Then, you can make sure the reasons fit your app and that it’s sensible to trade some control to save time building with AI.
- Quick and Early Results: AI builders turn a prompt into screens in minutes. You can also ask ChatGPT for Swift code many times a day if you need help fast. There’s a monthly fee for many builders, so factor that in, but knowing you’ll get working screens quickly helps.
- Room to Test Ideas and Demos: You choose what to build, including testing app ideas before a full build. What other tool lets you try a whole app idea so you can see if it lands?
- Big Learning Potential: You can learn a little or a lot of Swift as you like since you set your pace. While there are App Review rules about what an app must do, that’s the main thing in your way. If you check the code AI writes and test on a real iPhone, there’s plenty you can learn.
- Limited Payment and Data Options: There are real limits on the payments and data an AI builder can handle. You may not even get full code access. If your app takes payments, stores health data, or needs to scale, a builder may not allow it.
- Flexible Changes: You decide when you change the app with an AI builder. It might be daily, a couple of times a week, or now and then; and only store updates need App Review. You can choose at the last second to change a screen and rebuild. Conversely, you can undo a change if you don’t like it a few minutes later. Just roll it back and get on with the day.
- No Free Pass at App Review: You don’t get approval just because an AI built it. If the app is a thin copy of a website, guideline 4.2 can reject it; it’s that simple.
It's easy to start with Octal Digital: we build native iOS apps in Swift and SwiftUI, from $15,000.
How Much Does It Cost to Make an iPhone App?
Plenty of people think making an iPhone app is all about the code. Of course, the code is the core, but what many founders miss is the costs tied to getting onto Apple’s store as well. To start, you’ve got the developer fee and the build itself, extra tools so you don’t lose time, and more. Below we have outlined the main costs involved in making an iPhone app. Bear in mind that every app’s costs will vary.
“I built my app in a weekend.”
“My app cost me $500.”
“I pay Apple to sell my app.”
You’ve probably heard each of these and plenty of versions of each. In truth, they don’t show you the full picture, and they won’t help you decide if making an app is right for you, or if your budget is right.
Checking the actual numbers will help you work out if it pays off in your case to build an app. Or, if you’re already building, where you can make changes to hold on to more of your budget.
What Apple Charges
Apple gives you a flat yearly fee, currently at $99 per year.
| What you pay for | Cost | Notes |
|---|---|---|
| Xcode | Free | Download it from the Mac App Store |
| Apple Account | Free | Lets you run apps on your own iPhone |
| Apple Developer Program | $99 a year | You need it to publish |
| TestFlight | Free | Comes with the program for beta tests |
| App Store commission | 15% or 30% | 15% in the Small Business Program if your proceeds were up to $1 million the prior year |
Knowing your fees is the clearest way to judge if your app can pay off because it tells you how much you must earn just to break even. Say, for example, if your app sells for $4.99, you know Apple keeps a cut of each sale before you get paid.
What a Team Charges
The biggest expense for most founders is going to be development. Even if you use a builder, you still pay for that tool with money and time. So how do you work out what you’re spending on each feature?
Once you know your hourly rate, you can work out what you’re paying per feature in labor. For instance, apps at Octal Digital start from $15,000, and the work runs $25 to $50 an hour, set by scope after a free consultation.
When Should You Hire an iOS App Development Company?
There is one big catch to the do-it-yourself plan that exists in all app categories though. Even if you learn Swift, your users’ data may still be in danger if you make any type of security error or are found careless. Examples of such errors could be:
- Storing your users’ passwords in plain text
- Knowing about a broken login check, failing to patch it and then getting hit by a breach where someone is harmed because of the login
- Any other type of mistake where you knowingly chose not to act to fix the bug/problem.
Plenty of founders are under the belief that they cannot be rejected if they use a builder. But in fact, using a builder will not shield you against App Review for your own thin features, data leaks, or other type of basic mistake in relation to your app. If you and your builder both are found lacking in a review of this nature, your launch and your users’ trust could still be in danger.
For most first-time founders, coding it or a builder will likely be the smartest option but there are some cases where an iOS team could make sense. Both builders and teams actually share a lot in common:
- Faster launch
- Less code for you to write
Questions to Ask Before You Hire
The time savings might make an iOS team seem like an easy call but there are certainly some questions to ask with this route:
- Ownership of the code and the Apple Developer account should be yours, which you will eventually need for updates.
- You might have to pay hourly rates on the time the team spends on changes.
- Your feature list could be trimmed to fit a fixed price.
- It will be more costly to fix App Review rejections if the team doesn’t handle them.
- There may be upkeep costs you have to plan for (the same goes for builders too).
The moral of this tale when it comes to iOS teams is that a team could be worth it but they are fairly complex and there are loads of tradeoffs that you and your partners should think over.
If you are keen on hiring a team we strongly recommend that you talk with an agency, and ideally one that focuses on iOS and cross-platform apps. There is plenty of mixed advice on the web when it comes to app pricing because it’s tempting to focus on the low hourly rate and skip over all of the complicated trade-offs.
For now, you should begin thinking about what kind of build you would like to make. If you’re an occasional founder or you don’t hold much data at risk, a builder might do. But if you’re concerned about the security issues and/or wish to give your app that added layer of quality, a custom build is likely the better option. And naturally if your app is beginning to bring in real income, it may be the moment to talk to an iOS team about a native rebuild.
How Octal Digital Builds iPhone Apps
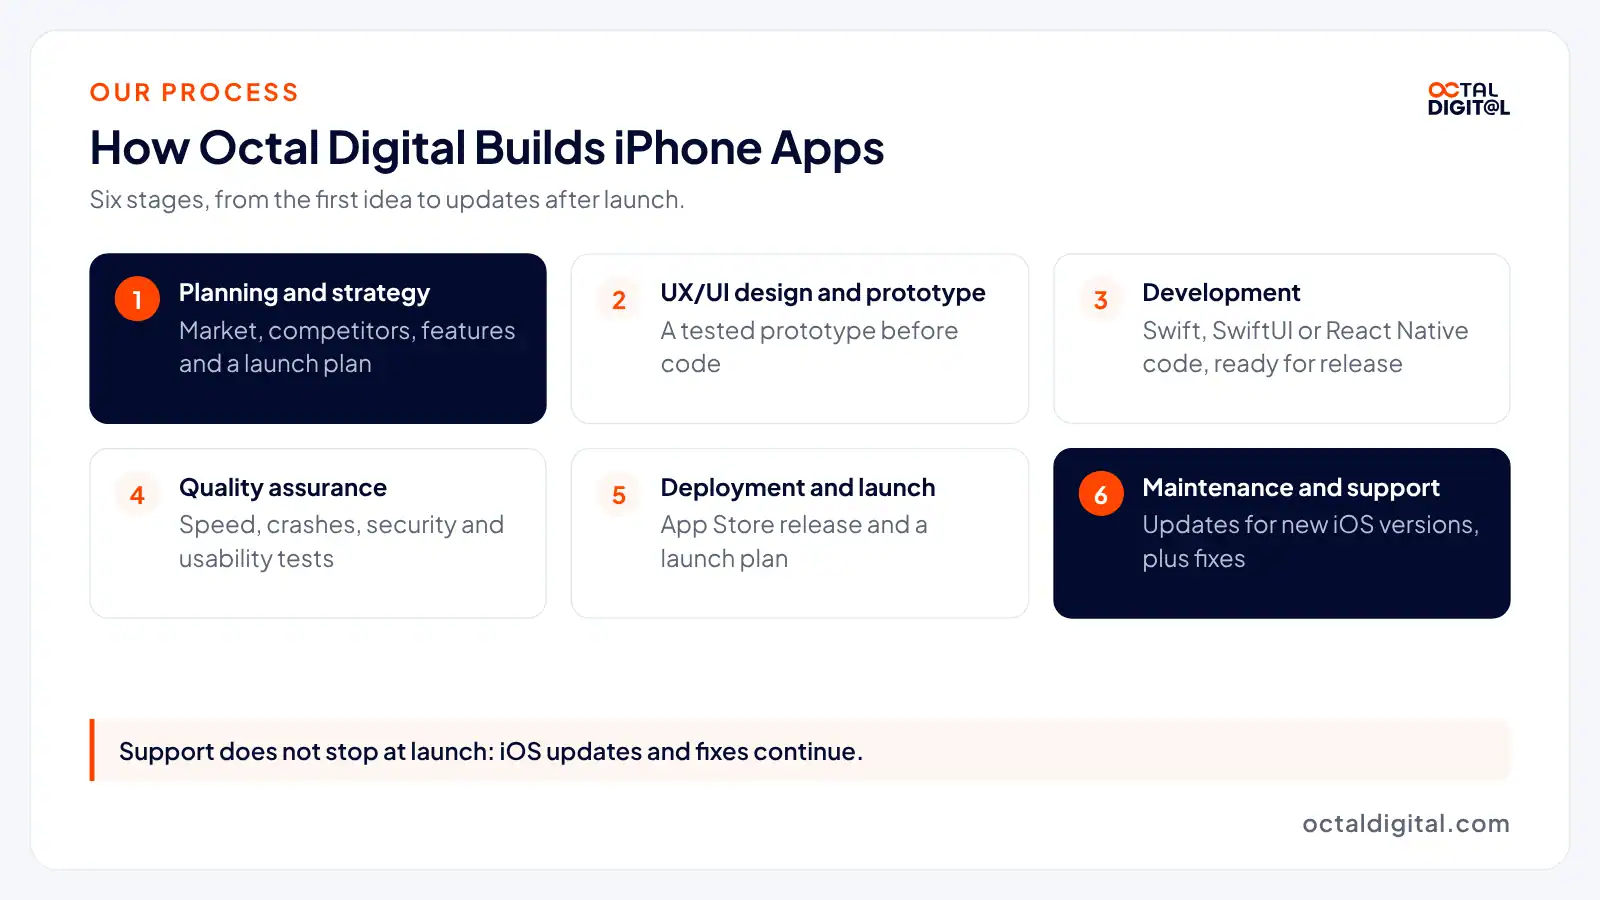
Octal Digital is an iOS app development company with a Houston office that combines careful planning with development, testing and support. For founders and especially small businesses, Octal Digital covers six stages, from planning to ongoing support.
Founders will still own the idea and the roadmap but our process neatly splits the work into those stages, from planning and UX/UI design to iOS development, QA testing, launch and ongoing support. The main downside of a team is the potential extra budget you may have to plan for. The cost is pretty reasonable (apps start from $15,000) in most cases but in hourly work for example, you pay $25 to $50 an hour, set by scope after a free consultation.
You can launch the core and add more whenever you like, giving you the freedom to grow around real users while earning early income.
- A written scope and cost range
- Fixed price or hourly, your choice
- 5.0 rating from 250+ client reviews
Frequently Asked Questions
Making an iPhone app isn’t hard, but it may take a few rounds to get live because of App Review. Here’s what else you should know about making an iPhone app.
Can I make an iPhone app for free?
iPhone apps can start with free tools. While Apple provides Xcode and a free Apple Account when you test on your own iPhone, it’s not enough to get you onto the store if you plan to publish. You must also join the Apple Developer Program at $99 a year, and you’ll need access to a Mac.
How much money do I need to create an app?
The typical app budget depends on scope. You’ll spend $99 a year on Apple’s program if you code it yourself, or from $15,000 if you hire Octal Digital.
Can ChatGPT build me an app?
ChatGPT won’t reliably build a full app for you. Because it’s a chat assistant, you are in charge of all steps related to setting up Xcode, testing the code, and submitting it to App Review. While ChatGPT can provide working Swift code if you ask for one screen or feature at a time, you must still check and test it yourself.
Do I need a Mac to make an iPhone app?
Yes. When you have the finished code, build and upload it from Xcode on a Mac for Apple’s review.
How long does it take to make an iPhone app?
Each app has different steps that take the most time, but often design and testing are the longest parts, especially for apps with logins and payments. During the build, the busiest stretch is early on, while the core features take shape.
How do iPhone apps make money?
Apple handles the payments for paid apps, in-app purchases and subscriptions sold through the App Store, so you won’t have to build a checkout for those sales; Apple keeps 15% or 30% of each one.
Can I make an iPad app the same way?
The steps stated above are for iPhone, the most common Apple device. However, some apps, such as iPad and Mac apps, need extra layout work. Typically, you must test on a larger screen (in the Simulator or on an iPad) and check the layout in both portrait and landscape.
Have a project in mind? Get a free consultation.
Tell us what you want to build. We reply with next steps, a rough timeline and a cost range.
(800) 995-3369
Matthew Jones supports Octal Digital as a Digital Strategist and trusted technology advisor, helping guide clients through scalable solutions, emerging tools, and smart development strategies that align with business goals and growth.